
How to Propagate Geraniums from Stem Cuttings
Vibrant geranium flowers are favorites of home gardeners, adding color to window boxes, borders, and beds. There are three types: the hardy cranesbill (Geranium spp.), the hanging ivy type (Pelargonium peltatum), and the garden geranium (Pelargonium x hortorum). In this brief article, we zero in on.
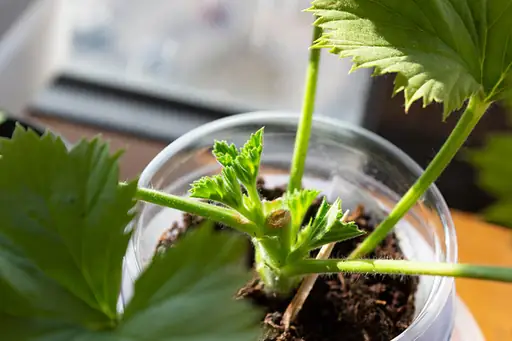
Vibrant geranium flowers are favorites of home gardeners, adding color to window boxes, borders, and beds.
There are three types: the hardy cranesbill (Geranium spp.), the hanging ivy type (Pelargonium peltatum), and the garden geranium (Pelargonium x hortorum).
In this brief article, we zero in on how to start new plants by taking stem cuttings from existing ones.
Here’s what’s in store:
What You’ll Learn
- Preparing a Stem Cutting
- Rooting Stems in Water
- Rooting in Potting Medium
- Transplanting
Read on to learn how easy it is.
Preparing a Stem Cutting
The best time to take a cutting is when a plant has a flush of new growth, and before it sets buds, at any time during the growing season.
If you are growing garden geraniums as annuals, taking cuttings in fall before the plants fade means you’ll have fresh new ones to plant out in spring.
Here’s how to do it:
Choose a sturdy stem with healthy leaves. Try to avoid the flimsy newest growth and the older, woodiest stems, as well as any with discolored or damaged foliage.
Use clean, sharp pruners, or a fine blade to slice through a stem.
Make the cut just below a leaf node and four to six inches down from the stem tip.
Snip off the lower foliage, leaving two or three leaves at the top, so you have three to four inches of bare stem. Remove any flower or leaf buds, as they might direct energy away from root formation.
Rooting Stems in Water
Place the stem in a clean, clear glass or jar that is four to six inches deep.
Fill the jar with enough water to cover the main stem, but not enough to touch the leaves.
Place on a sunny windowsill in a location that maintains an average temperature of 65-75°F.
Change the water daily to keep it fresh. After about four weeks, you should see roots developing at the bottom of the stem.
Rooting in Potting Medium
An alternative method is to use a sterile potting medium instead of water.
Choose a clean container with good drainage holes that is four to six inches deep.
Fill the container with potting medium, to about one-half inch below the rim. If desired, you can dip the cut end of the stem into powdered rooting hormone.
Make a hole and place the stem into the potting medium, pushing it down far enough to cover all the places where leaves were removed, as roots will form from these leaf nodes.
Firm the potting medium around the stem to anchor it firmly.
Water thoroughly and place in a location with an average temperature of 65-75°F and bright sunlight. You can use a heat mat and grow light if you wish.
Keep the potting medium lightly moist but never allow it to become soggy or to completely dry out.
Some folks like to create a mini greenhouse for a cutting by placing a clear plastic bag over the pot. This is a clever way to maintain the appropriate ambient temperature and moisture required.
If you choose this method, be sure not to seal the bag or expose the plant to direct sunlight or it may become overheated.
Transplanting
Once you see roots through the clear container, or new shoots on the stems growing in the potting medium, you’ll know that your cuttings are thriving.
When the roots are one or two inches long, or you see new foliar growth in your potted cuttings, you can start the process of acclimating them to the outdoors, a process called hardening off.
If you took your cuttings in fall, make sure you wait until all risk of frost has passed.
Set the plants outside for a few hours each day for a week. Place them in a sheltered location at first, and gradually out in the open. Skip any days with inclement weather in the forecast.
At the end of the week, it’s time to complete the propagation process by planting your rooted and sprouted cuttings out into the garden.
Geraniums Galore
For those of us in the Northeast, like me, it’s economical to take cuttings from plants that we can only grow as annuals, thanks to our freezing winter temperatures.
And it’s really fun to have a plant nursery indoors while the ground outside is frozen solid.
Give geranium propagation a try, and don’t be surprised when you can’t find enough sunny spots for all of your little plant babies!
Have you tried taking cuttings from your geraniums? Let us know in the comments below.
If you think you’d like to try your hand at plant propagation, you’ll enjoy reading these articles next:
- How to Grow Lavender from Cuttings
- Propagating Succulents in 5 Easy Steps
- Into the Cloning Vats: Easily Propagating African Violets
- Facebook248
- X
Questions et discussion