
How to grow seed potatoes
Seed to Harvest Growing Guide How to grow seed potatoes A practical guide to preparing certified seed potatoes, planting into cool soil, hilling stems, protecting foliage, and harvesting clean tubers for new potatoes or storage. Use certified stockHill repeatedly as stems growCure mature tubers.
Seed to Harvest Growing Guide
How to grow seed potatoes
A practical guide to preparing certified seed potatoes, planting into cool soil, hilling stems, protecting foliage, and harvesting clean tubers for new potatoes or storage.
Use certified stockHill repeatedly as stems growCure mature tubers before storage Shop seed potatoes →Start the guide ↓ Crop family: Solanaceae SeasonCool to mildPlant before summer heatPlant depth3–4 inchesHill as stems growLightFull sunAt least 6–8 hoursSpacing10–12 inches30–36 inches between rowsHarvest70–120 daysEarly to late varietiesBefore you begin
Start with healthy seed tubers and loose soil.
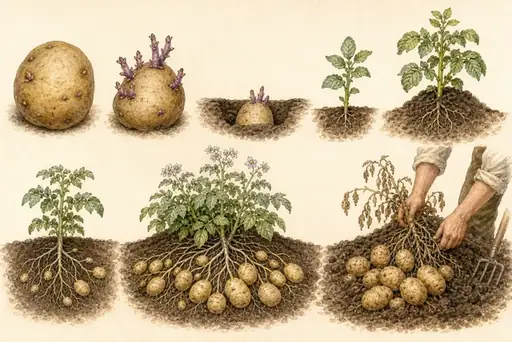
Potatoes form on underground stolons above the original seed piece. Loose soil, steady moisture, and repeated hilling keep those tubers covered and prevent green, bitter skin.
Best first decisionBuy certified seed potatoes rather than planting grocery potatoes, which may carry disease or be treated to resist sprouting.Build your potato-growing plan
Plan cool planting, row space, seed quantity, and harvest timing.
Match early, midseason, or late varieties to your frost-free season and desired storage use.
When to plant potatoesFind your local planting windowUse your ZIP code to connect workable soil with frost and summer heat.Check potato timing →Lay out the potato rowsReserve full-sun hilling spaceAllow wide rows for drawing soil around stems and digging later.Plan the potato bed →How many seed potatoesCalculate what you needEstimate seed pieces from row length and 10–12 inch spacing.Calculate potato seed →Plan the harvest dateWork backward from harvestUse variety maturity to organize planting, vine kill, and curing.Calculate potato timing →Seed Potatoes at a glance
The path from seed to harvest
Select any milestone to jump directly to its full instructions.
01PlanAfter frost02SowWarm soil03Thin2–3 leaves04PollinateFirst flowers05ProtectScout weekly06Harvest90–120 daysStage 1–3
Prepare seed pieces and plant into cool soil
Short sturdy sprouts and properly healed cuts give plants the cleanest start.
01Chit and cut
Two to four weeks before planting, expose seed potatoes to bright indirect light around 50–60°F for short sprouts. Cut large tubers into 1.5–2 ounce pieces with at least one strong eye.
- Leave small tubers whole.
- Let cut surfaces dry and callus 1–3 days.
- Discard soft or diseased pieces.
Plant after soil becomes workable
Set pieces cut-side down 3–4 inches deep and 10–12 inches apart, with 30–36 inches between rows. Soil near 45–50°F supports emergence.
Protect emerging shootsCover tender growth if a hard freeze threatens, but remove protection when temperatures recover. 03Hill the stems
When plants reach 6–8 inches, pull 3–4 inches of loose soil around stems, leaving the top leaves exposed. Repeat until hills are 8–12 inches high.
- Use loose soil, straw, or clean compost.
- Never expose developing tubers to light.
- Avoid damaging shallow roots and stolons.
Stage 4
Keep tuber growth steady underground
Moisture is most important from flowering through tuber bulking.
WWater evenly
Supply 1–2 inches weekly, avoiding drought followed by sudden saturation.
HMaintain hills
Repair washed or cracked hills immediately so no tuber skin receives light.
FFeed by soil test
Avoid excess nitrogen, which delays tuber formation and keeps vines overly lush.
SScout foliage
Inspect leaves for beetles and blight; act before defoliation or disease reaches stems.
Growth checkpoints
Know what to watch for.
Flower sequence, fruit set, rind development, and stem color reveal the crop’s progress.
Early growthVigorous runners
Leaves expand without beetle damage or sudden wilting.
First bloomMale flowers first
Female flowers with a tiny fruit at the base follow as vines mature.
After pollinationFruit enlarges
The flower closes while the young seed potato remains green and steadily swells.
Late seasonHard rind and corky stem
Fruit reaches full color and the rind resists a thumbnail.
Stage 5
Diagnose potato problems early
Open a symptom to compare what you see, likely causes, and the next practical check.
PestColorado potato beetlesOrange eggs, red larvae, and skeletonized leavesInspect leaf undersides, crush egg masses, handpick adults and larvae, rotate crops, and use only treatments labeled for potatoes.
DiseaseLate blightWater-soaked dark lesions spreading rapidlyRemove and bag affected plants, never compost them, avoid overhead irrigation, destroy volunteer potatoes, and follow local blight alerts.
DiseaseCommon scabRaised or pitted corky lesions on tubersUse certified stock, rotate crops, avoid fresh manure and excessive lime, and keep soil evenly moist during early tuber set.
Growing disorderHollow heart and crackingInternal cavities or deep exterior splitsPrevent rapid growth swings with even water, proper spacing, balanced fertility, and harvest at the variety’s recommended size.
Stage 6
Dig gently and cure storage potatoes in darkness
Harvest new potatoes after flowering, or wait for mature storage tubers until tops yellow and die.
- Prepare: Stop watering 1–2 weeks before mature harvest and allow skins to set.
- Dig: Insert a fork well outside the hill and lift from beneath to avoid spearing tubers.
- Cure: Hold unwashed potatoes 7–14 days around 50–60°F in darkness with high humidity and airflow.
Choose with purpose
Match potato texture and maturity to your kitchen
Compare an all-purpose yellow, a colorful early red, and a gourmet fingerling.
All-purpose yellowYukon GoldGolden flesh with rich buttery flavor and a balance of waxy and starchy texture.Shop Yukon Gold →Early redRed NorlandSmooth red skin, bright white flesh, and dependable yields for new potatoes and frying.Shop Red Norland →Gourmet fingerlingFrench FingerlingBright red skin, creamy yellow flesh, and medium fingerling tubers for roasting and salads.Shop French Fingerling →Questions gardeners ask
Seed potato growing FAQ
Quick answers for certified stock, cutting, planting, hilling, watering, containers, harvest, curing, and storage.
Why use certified seed potatoes?Certified stock is inspected for disease and is safer than grocery potatoes, which may carry pathogens or resist sprouting.
Should seed potatoes be cut?Leave small tubers whole. Cut larger ones into 1.5–2 ounce pieces with at least one healthy eye.
What is chitting?Chitting exposes seed tubers to cool bright indirect light so they develop short sturdy sprouts before planting.
How deep should seed potatoes be planted?Plant 3–4 inches deep, then hill soil around stems repeatedly as plants grow.
How far apart should potatoes be?Space pieces 10–12 inches apart with 30–36 inches between rows.
Why must potatoes be hilled?Hilling gives stolons loose soil for tubers and blocks light that turns skins green and increases glycoalkaloids.
How often should potatoes be watered?Provide 1–2 inches weekly, keeping moisture especially even from flowering through tuber bulking.
Can potatoes grow in containers?Yes. Use a large container with drainage, plant one or a few pieces according to volume, and add mix as stems grow.
When can new potatoes be harvested?Carefully feel beside plants after flowering and remove a few small tender tubers without uprooting the plant.
When are storage potatoes ready?Wait until vines yellow and die back and skins no longer rub off easily.
How should potatoes be cured?Keep unwashed tubers in darkness for 7–14 days around 50–60°F with high humidity and good airflow.
How should potatoes be stored?Store cured potatoes dark, ventilated, and cool around 38–45°F. Do not refrigerate for long periods or store beside onions.
Ready to plant?
Choose seed potatoes for your garden.
Compare pie, carving, miniature, giant, ornamental, hulless-seed, organic, heirloom, and hybrid varieties.
Shop all seed potato seed →
คำถามและการอภิปราย