
Move Seedlings Without Losing Momentum
Urban Farmer Transplanting Guide Move Seedlings Without Losing Momentum Choose a ready plant, harden it gradually, protect the root ball, and match transplant day to the crop and weather. Check transplant readinessFollow the process A successful handoff Transplanting is a transition, not a single.
Urban Farmer Transplanting Guide
Move Seedlings Without Losing Momentum
Choose a ready plant, harden it gradually, protect the root ball, and match transplant day to the crop and weather.
Check transplant readinessFollow the processA successful handoff
Transplanting is a transition, not a single step
Seedlings must adjust from protected conditions to stronger sun, wind, fluctuating temperatures, and a much larger root zone. Readiness, hardening, gentle handling, and immediate aftercare all determine how quickly growth resumes.
✓Plant readiness
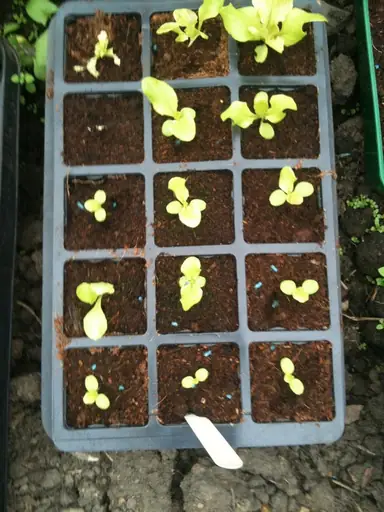
A sturdy stem, healthy color, multiple true leaves, and a cohesive but not tightly root-bound root ball.
☁Site readiness
Prepared soil, correct spacing, suitable soil temperature, and a mild weather window for that crop.
≈Aftercare readiness
Water on hand plus shade, wind, frost, heat, or pest protection if conditions require it.
Interactive checkpoint
Is this seedling ready to transplant?
Check every statement that is true. Crop-specific growing instructions and current weather still take priority.
Readiness checklist
The seedling has at least 2–3 true leaves and sturdy growth.Roots hold the mix together, but are not densely circling the pot.The plant has completed a gradual hardening-off period.Soil and forecast conditions suit this specific crop.The planting bed is prepared, moist, and properly spaced.I can water immediately and protect the plant if needed.Complete the readiness check
A transplant is only as ready as the plant, planting site, and aftercare plan.
Seven to fourteen days before planting
Harden seedlings in stages
Stage 1Protected shadeBegin with short outdoor periods away from direct sun and strong wind.
Stage 2Morning lightIncrease time outdoors and introduce gentle early-day sun.
Stage 3Longer exposureGradually add direct light and normal breezes while watching moisture closely.
Stage 4Near garden lifeExtend to full days and suitable nights only when the crop and forecast allow.
Adjust to the weather. A cloudy day is gentler than a clear day; hot sun and wind can dry small cells very quickly. Move plants back to protection when they wilt or damaging temperatures threaten.
Planting-day workflow
From container to prepared soil
1Choose the window
Favor a mild, calm, overcast day or late afternoon. Avoid frozen soil, hard frost, extreme heat, and drying wind.
2Water both sides
Water seedlings before removal and moisten the planting bed so neither root ball nor surrounding soil is dry.
3Set final spacing
Mark spacing from the seed packet or growing guide before digging. Plan for mature size, airflow, and harvest access.
4Dig the right hole
Make it slightly wider than the root ball. Depth depends on the crop; most should remain at their original soil line.
5Release without pulling
Support the root ball and ease it from the container. Never lift a seedling by its stem.
6Inspect the roots
Keep a healthy young root ball intact. Gently loosen only densely circling roots when the crop tolerates handling.
7Set and backfill
Place the plant upright at the proper depth, fill around roots, and firm just enough to remove large air pockets.
8Water in deeply
Water around the base immediately to settle soil against roots. Refill soil if settling exposes the root ball.
9Protect and observe
Add temporary shade, row cover, collars, supports, or wind protection as needed, then inspect daily during establishment.
Planting depth matters
Do not bury every crop the same way
| Plant group | How to set it | Important caution |
|---|---|---|
| Most vegetables and flowers | Set the top of the root ball level with the surrounding soil. | Burying the crown or stem can encourage rot. |
| Tomatoes | May be planted deeper, removing leaves that would be below soil. | Keep remaining foliage above the soil and avoid damaging the stem. |
| Leeks | Set in a deeper hole or furrow according to the growing method. | Do not pack soil tightly into the growing point. |
| Cucumbers, squash and melons | Keep at the original depth and transplant young. | Their roots dislike disturbance; handle the root ball minimally. |
| Crown-forming plants | Keep the crown at the crop’s specified level. | Too deep can rot the crown; too shallow can expose roots. |
The first two weeks
Help roots reestablish
≈Monitor moisture
Keep the root ball and surrounding soil evenly moist, not waterlogged. Small transplants dry faster than established plants.
▧Mulch carefully
After watering, apply appropriate mulch without piling it against stems or burying small plants.
↟Support early
Install stakes, cages, or trellises at transplanting to avoid later root damage.
☀Reduce abrupt stress
Temporary shade or row cover can help during unusual heat, wind, cold, or intense pest pressure.
○Wait before judging
Some pause in top growth is normal while roots establish. Watch the newest growth rather than older cosmetic damage.
!Do not overfeed
Use soil testing and crop directions. Excess fertilizer around tender roots can cause injury rather than faster recovery.
Read the symptoms
Transplant troubleshooting
The plant wilts immediatelyCheck root-ball moisture, hot sun, wind, and root damage. Water thoroughly and provide temporary shade while roots reconnect with surrounding soil.
Leaves turn white or paperyThis often indicates sunscald from moving into intense light too quickly. Protect the plant and harden more gradually; healthy new growth may recover.
Leaves yellow after plantingCheck drainage, saturated soil, cold stress, damaged roots, and planting depth before adding fertilizer.
The plant is loose or leaningFirm soil gently around the root ball, water to settle it, and add support where wind or mature growth habit requires it.
Growth stops for more than a short pauseInspect temperature, moisture, root binding, depth, and pest injury. Severe circling roots or an unsuitable planting window can delay establishment.
Seedlings are cut off or disappearInspect at dusk and around the soil line for local pests. Use an appropriate barrier, collar, or secured row cover based on the culprit.
Keep the season connected
Continue with Urban Farmer guides
Bed layout and timingGarden Planning GuideSet spacing, planting windows, and permanent crop locations before transplant day.
Plan the gardenGrow sturdy seedlingsStart Seeds IndoorsManage light, moisture, temperature, potting up, and hardening.
Open the guideSkip transplantingDirect Sowing GuideIdentify vegetables that are better planted in their final position.
Compare methodsCurrent seasonWhat to Plant NowMatch crops to the planting window in your area.
Check timingExact crop directionsVegetable GuidesConfirm mature spacing, planting depth, temperature, and aftercare.
Browse vegetablesPlanting suppliesTools & SuppliesFind labels, watering equipment, supports, protection, and starting supplies.
Shop suppliesReady for planting day?
Questions & discussion